Wednesday, December 26, 2012

Creamy Tomato Basil Soup

It's really cold outside.  It needs soup.  And so came out this recipe from Pioneer Woman.

If you're worried about the alcohol not getting cooked off, just keep the heat on a bit longer after you put in the cooking wine, and wait to put in the cream until after you turn off the heat.  There are non-alcoholic replacements for sherry if you're very particular, but they don't taste near the same and I don't know what they are.

I served this with hot garlic bread.  It was all very tasty and warmed us all up.  And we have a little extra for another time, bonus!

So yum.
Creamy Tomato Basil Soup
from Pioneer Woman Cooks

6 Tbsp melted butter

1 whole medium onion, diced

1 bottle (46 oz) tomato juice (I couldn't find one so got a bigger one and have extra)

2 cans (14 oz each) diced tomatoes

1 Tbsp chicken base (I couldn't find this either, so I just dissolved I think 6 boulion cubes in 1T water

3 Tbsp (or up to six if you want) sugar

1 pinch salt

black pepper to taste

1 cup cooking sherry (I used white cooking wine because that's what we had, but it's really the same)

1 1/2 cup heavy cream

chopped fresh parsley

chopped fresh basil


1. Sautee onions in butter until translucent.

Pre-cream and basil
2. Add canned tomatoes, tomato juice, chicken base, sugar, salt, pepper, and stir.

3. Bring to a near boil, then turn off heat.  Add in sherry and cream and stir. (Or see my previous statement)

4. Add in parsley and basil to taste.
Yay greens

Serve it up hot!

Hungry men.  No leftover bread.

Tuesday, December 25, 2012

Trying Indian

We love Indian food.  But it's expensive to eat out at the really good Indian places here (Bombay House, yum!), and I've never tried to make it myself, until now.

A while ago we got this "India's 500 Best Recipes" book from the bookstore at school (super clearance section, yeah!).  I decided to try a few of our flagged recipes when my parents came to town.  My mom is always complaining that I never cook for her (probably because she lives 12 hours away), so this was my chance to show off.

I think next time I won't try three new recipes on the day I'm making dinner for visitors, because it got to be a bit too stressful.  The food turned out really well though, and I'll probably be making some of this again.

A note about some of these spices: you will probably need to get the garam masala, ground turmeric, and tamarind pulp at an Asian food store.  The one we went to was across Center street from the Target in Orem.  There are a couple more in Provo but they were closed when we went looking (also, probably don't wait until a few hours beforehand to go searching).  Also, not only could we not find the tamarind pulp at the store, but the lady didn't even know what it was.  I looked up a few replacements, but replacing it with lemon juice really didn't have the flavor it should have (but it was still good).  So just plan ahead I guess.

Deener.

Chicken in Cashew Nut Sauce
from India's 500 Best Recipes

2 medium onions (we were all in tears-- even the cat-- during meal prep this time)

2 Tbsp tomato puree or paste

2 oz or 1 1/2 cup cashew nuts (fyi, these were kind of pricey, maybe I just don't know where to look)

1 1/2 tsp garam masala

1 tsp crushed garlic

1 tsp chili powder (I omitted this because my mom is sensitive to spicy stuff)

1 Tbsp lemon juice

1/4 ground turmeric

1 tsp salt

1 Tbsp plain yogurt

2 Tbsp oil

2 Tbsp chopped fresh coriander/cilantro

1 Tbsp golden raisins (I omitted these too because raisins are gross)

1 lb boneless skinless chicken breast, cubed

2 1/2 cups button mushrooms (it doesn't say to cut them, but I did, into quarters-ish)

1 1/4 cups water


1. Cut onions into quarters and place in food processor or blender and process for about a minute.

2. Add tomato puree, cashews, garam masala garlic, chili powder, lemon juice, turmeric, salt, and yogurt.  Process the mixture for another minute or more.

3. In a heavy pan, heat the oil, lower the heat to medium and pour in the spice mixture from the food processor.  Fry the mixture for 2 minutes, lowering the heat a little more if necessary.

4. When the spice mixture is lightly cooked, add half the chopped fresh cilantro, the raisins, and the chicken cubes.  Continue to stir-fry for another minute.

5. Add the mushrooms, pour in the water, and simmer.  Cover the pan and cook over a low heat for about 10 minutes.

6. After this time, check that the chicken is cooked through and the sauce is thick.  Cook for a little longer if necessary, then spoon into a serving bowl (or just on the plates).  Garnish with the rest of the cilantro.  Serve with rice.

Doesn't look like much, but it sure is tasty.

Cauliflower and Coconut Milk Curry
from India's 500 Best Recipes

1 cauliflower (this turned out to be a ton, so we didn't use every floret)

2 medium tomatoes, skinned if you like (I didn't)

1 onion, chopped (again with the tears)

2 garlic cloves, crushed

1 fresh green chili, seeded (I omitted this for previously mentioned reasons)

1/2 tsp ground turmeric

2 Tbsp sunflower (or other) oil

14 fl oz can coconut milk

1 cup water

1 tsp granulated sugar

1 tsp tamaring pulp, soaked in 3 tbsp water (again, we replaced this with lemon juice, there are a variety of other things to replace it with if you search)


1. Trim the stalk from the cauliflower and divide into tiny florets.  Chop tomatoes into 1-in pieces and set aside.

2. Grind the onion, garlic, green chili, and ground turmeric into a paste in the food processor.

3.  Heat the oil in a heavy pan, wok, large frying pan, karahi, whatever.  Fry the spice paste to bring out the aromas but do not allow it to brown.

4. Add the cauliflower florets, toss to coat well in spices.  Stir in coconut milk, water, sugar, and salt to taste.  Simmer for 5 minutes.  Strain the tamarind and reserve the juices.

5. Add tamarind juice and chopped tomatoes to the pan then cook for 2-3 minutes only.  Taste and adjust the seasoning as necessary, then serve.

Cauliflower num

Naan!!!
from India's 500 Best Recipes

2 cups unbleached white bread flour

1/2 tsp salt

15g fresh yeast

4 Tbsp lukewarm milk

1 Tbsp vegetable oil

2 Tbsp plain yogurt

1 egg

butter, for brushing


1. Sift flour and salt together in a large bowl and set aside.  In a smaller bowl, cream the yeast with the milk.  Set aside for 15 minutes.

2.  Add yeast and milk mixture, oil, yogurt, and egg to the flour.

3.  Combine the mixture using your hands until it forms a soft dough.  Add a little more of the lukewarm water if the dough is too dry.

4.  Turn the dough out onto a lightly floured surface and knead until smooth (about 10 minutes).  Return dough to the bowl and let it rise until doubled in size, or for one hour.

5. Preheat oven to highest setting.  It shouldn't be any lower than 450 degrees.

6. Turn out dough onto floured surface and knead for 2 more minutes.  Divide into equal pieces, shape into balls and roll out into teardrop shapes (we made five large pieces).

7. Throw naan onto preheated cookie sheets and bake until puffed and browned, 3-4 minutes.  Place under broiler (if you have one separate) for a few seconds until browned.  Brush with butter and serve.

Wednesday, December 19, 2012

Spiced Peach Pie

Remember all those ages ago when I made that apple pie for that silly pie contest?  This is essentially the same, only I decided to make it with peaches instead.  I make this peach pie often as a treat for people who do me great favors, but I usually only have access to canned peaches (and it's delicious just with those, believe me).  This time, we were able to use some of the fresh peaches from Sam's grandparents' that we'd frozen back in September.

Another tweak I made from the original was to add a little spice to the crust.  I added a tablespoon or so of cinnamon sugar and a good shaking of ground nutmeg.  However, you don't really need it.  I just thought it made it extra special.  Oh, and if you have an amazing pie crust recipe that you think is the greatest of all time, please share it with me.  I'm always on the hunt.

This pie is delicious, and the peaches are sweet and literally melt in your mouth.

Why do I always forget to take a picture of the slice?
Spiced Peach Pie
modified conglomerate of recipes


Filling
approx 2-3 cups of fresh cut peaches (I think this is about 6 peaches) or 2-3 cans sliced peaches
2 T flour
3/4 cup sugar
pinch or two of salt
2 T cinnamon
1/2 T nutmeg

1. Cut the peaches into slices if they aren't already.

2. Mix the flour, sugar, salt, cinnamon, and nutmeg. The original recipe called for far less cinnamon and nutmeg, so if you don't like flavor, reduce it all you like. Actually, the measurements I gave you for those two ingredients are more of my estimate. You should go more by what you think smells and looks like enough.

Spice those peaches
3. Pour the "spice mix" into the peach slices, and mix up with your hands (or a wooden spoon or rubber spatula. Don't dissolve the peaches.). Pour the mix into the pie crust, but be judicious about adding all the goop at the bottom of the bowl, because you don't want your pie to be drippy and dissolve the bottom crust)


Crust
2 cups all-purpose unbleached flour
a couple of pinches of salt
3/4 (one and a half sticks) of butter/ vegetable equivelant (or shortening, if you want to go the traditional route)
water

1. Mix flour and salt.  If you decide to spice the crust, now is where you would add it.

2. Get your butter out an hour or two beforehand to make sure its soft, or leave it on top of the oven while its preheating (but not for too long, or it will melt). Do not microwave the butter!! Not only does it make it too liquidy, but it separates the parts. Just make sure your butter is soft, because if it's too hard, it will be difficult to work with.

3. Cut the butter into little chunks (about 1T each) and plop into the flour mixture. Work in with a fork or pastry cutter until the chunks are considerably smaller, then work in with your hands. This will guarantee the butter is worked in properly.

4. Add water, a tablespoon or two at a time, and work it in. Use your hands to tell when it's ready. The dough should be a little past the point where it's just coming together. Work into a ball.

5. Separate the ball into two parts, one a little larger than the other. The larger ball will be your bottom crust. Pound and roll out the larger ball into a circle and drape over a 9-inch pie or cake pan lightly dusted with flour on the bottom. Pour in filling.

6. Repeat process with smaller ball. Drape over top of pie, pinching sides together, making the edges look fluted if you so desire. Cut a few slits in the center of the top crust so the filling can breathe and seep as it cooks. Sprinkle with a bit of cinnamon-sugar if you like.

Crusty
7. Place a cookie sheet under the pie to catch any drippings if you're worried about it. Put in oven pre-heated to 425 degrees. Cook for about 40-45 minutes (this will depend on your oven, of course). Pie will be done when the crust is golden brown.

Pomodoro Romano Sauce

When we were in Italy, one of the foods that I discovered I really loved was a jarred pomodoro romano sauce.  I've never seen it sold here in the States, and anyway, everything's better fresh, so I vowed to recreate it when we returned home.  I decided to alter a pomodoro sauce recipe I already had, and we invited our friends Autumn and Joe over to test out the finished product.

I also had a serious time trying to find fresh pasta.  Everywhere I go I can find fresh raviolis and tortellinis galore, but never any noodles.  Eventually I found it at our local(ish) farmers-type market grocery store, Sprouts.  I wish Utah Valley was more into eating fresh and good quality food.

According to Joe, who served a mission in Italy, it's totally uncouth to
put grapes on your plate, but I don't care.
Pomodoro Romano Sauce
modified from a recipe I think I got from Take Home Chef about 6 years ago

2 T olive oil
1 medium onion, chopped/diced
3 cloves garlic, chopped/diced
2 cans (they're large, I forget the size) whole, peeled tomatoes, drained and crushed by hand, juices reserved
1 tsp salt
1/4 tsp pepper
1 cup fresh grated/shredded Romano cheese (I could only find a three-cheese blend that was primarily Romano)
1/4 cup fresh basil leaves, torn into pieces

1. Heat oil in a large saucepan over medium-low heat.

2. Add onion and garlic and cook until vegetables are soft, about 5 minutes.

3. Carefully add tomatoes and about 3/4 cup of the reserved juices.  Season with salt and pepper.  I also added about a half a tablespoon of white sugar and a half a tablespoon of brown sugar to offset the tomato's bitterness, but that is optional.

Sauceh
4. Cook until sauce is thick, about 15 minutes.

5. Simmer for 20-30 more minutes.  Periodically stir with a wooden spoon (because everything tastes better when it's stirred with a wooden spoon), breaking up and squishing tomatoes and adding reserved juices as needed, until it's all in.

6. About ten minutes to the end, stir in the cheese, adding it slowly in small amounts until it's all stirred in.  Break up any clumps of cheese.

Cheesey deliciousness.
7. Add the shredded basil and stir in.

Mr Yumness
8. Serve immediately over fresh pasta.


A good time was had by all.  The boys even humored me for forced candid pictures, heh heh.


Oh, and we had pie for dessert.  Delicious pie.

Snickerdoodles

These are some of my favorite non-chocolate cookies (nothing beats chocolate...usually).  And Sam confessed to me the other day that these were actually his favorite cookies that I make of all the other kinds.  Taken aback!

Snicker.
I remember loving these as a child, but we didn't often make them.  Maybe because they require a secret ingredient that isn't super common, or really used for anything besides snickerdoodles.

Tartar: huah!  What is it good for? 
Anyway, they're sort of holiday-y in my mind, so here's a nice holiday treat!

Snickerdoodles
lightly modified from ye olde childhood recipe from Mom's recipe box

1 cup butter
1 1/2 cup sugar
2 eggs
2 3/4 cup flour
1 tsp baking soda
2 tsp cream of tartar
1/4 tsp salt

1. Cream the butter and sugar together.  In case you're wondering, the original recipe calls for half butter and half shortening, but butter is always better in my opinion.  Plus shortening is gross and I don't have any.  Your butter should be softish.  If it's frozen or too cold, let it sit out for a while, but do not melt it!  It will mix better and help the cookies be fluffier.

Cream it up, one two three
2. In a separate bowl, combine the flour, baking soda, cream of tartar, and salt.  Sift or whisk together.

3. Combine sugar mix and flour together.  You may need to work the dough with your hands if your butter was especially cold.

4. Round dough into little balls.  Roll in 2 Tbs of sugar and 2 tsp of cinnamon combined in a little bowl.

Give it a nice coating
5. Place balls an inch-ish apart on greased (or parchment-papered) cookie sheets.  Cook at 400 degrees for about 10 minutes.

Dainties!
6.  Let cool, then eat warm.  Maybe with hot chocolate.  Oh yum.

An encore

Monday, December 3, 2012

Eggnog Biscuits

Yesterday afternoon we got back from our two-week trip to Italy!  It was a crazy and fun time, and we had a lot of delicious food that I'll be talking about in future posts.  But today, I have for you these festive biscuits!

Because we got in on a Sunday afternoon, and because our car decided to die while we were gone and left us with no way to get to the store, we had no food this morning for breakfast.  Lying awake in the middle of the night thanks to jet lag had me wondering what in the world we would eat, and my mind ran to my favorite I-forgot-to-go-shopping breakfast: biscuits!

Usually I have some Bisquik on hand for such emergencies, but we only have about half a cup left, and I'm trying to phase it out because I don't use it that often and it has all those preservatives that make me skeptical.

A biscuit-from-scratch recipe is pretty easy.  But without milk, it'd be useless (well, there's water, but I prefer not to eat things with the excitement of hard tack).  Fortunately, my brother in law persuaded us to take a leftover container of eggnog with us after we had dinner with them last night.

I hate eggnog.  Sam loves it.  Since the eggnog expires today, I was afraid I'd be nursing a Sam sick from an eggnog binge by the end of the day.

This is literally the only thing in our fridge.
THE ULTIMATE SOLUTION TO ALL PROBLEMS IN MY LIFE (I wish): make eggnog biscuits!

So that's just what I did, simultaneously (but temporarily) curbing my appetite for holiday goodness.
oh, oh, the mistletoe...
Homemade Eggnog Biscuits
de moi - makes about 9 large biscuits, more smaller ones

2 cups flour

1 T baking powder

1 T granulated sugar

1 t salt

1/3 cup shortening, margarine, or butter (I used butter)

1 cup eggnog

cinnamon and/or nutmeg to taste

1. Preheat oven to 425 degrees.

2. Sift together dry ingredients.

3. Cut butter into little chunks.  Work into flour mix with your hands (you can also use a pastry cutter if you're timid, but hands always work better).  The end result will be a sort of moldable, mealy flour.

4. Add eggnog and stir together (or keep using your hands) until just combined.  Dough should be sticky enough to pull away from the bowl.  If it's too wet, add a little flour.  If it's too dry, add a little more eggnog.

5.  If you're making drop biscuits (I always prefer drop biscuits, they have better texture in my opinion), just skip the next step and go straight to step 7.

6.  For round biscuits, knead the dough on a floured surface until it's less sticky.  Roll out to ~1/4" thickness.  Using a round cookie cutter or glass top, cut out biscuits.

7.  Place biscuits on greased (or parchment-papered) cookie sheet.  Bake for 13-15 minutes (mine went for just over 13 minutes and were only ever-so-slightly doughy in the center.  But I liked it.

8.  Eat while still warm.  We tried butter, jam, and honey, and decided the honey was the best topper.  But they are also very tasty plain.

Flavor note:  if you want a more subtle and less "spiced" taste, omit the cinnamon/nutmeg.  They're still very tasty.

look at that fluffy, crisp goodness

Now I'm off to plan some Christmas sugar cookies...

Tuesday, October 23, 2012

Brownie Double Chocolate Cookies

Sometimes (ie the past few months) I'm really lazy about the way I cook.  Like yesterday.  I was really craving something chocolately and delicious, and I haven't made any desserts in a long time.  However, the idea of going whole-hog into an elaborate and time-consuming cookie recipe did not sound so appealing.

I remembered that we had a few packages of Ghiradelli double dark chocolate brownie mix left in a cupboard somewhere (actually, I knew exactly which cupboard they were in...how could I forget?).  But I already had my heart set on cookies.  And so!  These were born:
I just realized how crummy of a picture this is...I think I'll go clean my lens. And stage it better next time (but those cookies I pulled out were so tempting, I had to eat some...)
Brownie Double Chocolate Cookies
from Food.com

1 regular package brownie mix

1/2 cup all-purpose flour

6 tablespoons canola oil

2 eggs, beaten

2 tablespoons water

6 ounces semi-sweet chocolate chips

1. Mix everything together.  The dough will be relatively stiff and very sticky.

2. Drop in small spoonfulls onto cookie sheet.  Warning: the dough is very sticky!  You will need to spray your cookie sheet.  I used parchment paper and I had difficulty getting them off.  I had to peel the paper off and even then a couple cookie bottoms didn't make it.

3. Cook in oven preheated to 350 degrees and cook for 9-11 minutes (mine went for maybe a little over 11 minutes but we have a stupid oven.  Test doneness by poking them gently with your finger.  The cookie will give but nothing should stick to you.  They will be puffy.

4. Let cool about 5-10 minutes on the sheet, then transfer to cooling rack.  The cookies will sort of deflate.  They are still delicious, and quite chewy.  They taste like brownies.  Go figure.

Makes 2-3 dozen cookies (that's my estimate...I didn't count)

Monday, October 22, 2012

Fruity Oat Muffins

While I was working in Tooele the past couple of weeks, I had no time for breakfast before I left the house.  Therefore, each Sunday I would make these muffins to take for breakfast in the car throughout the week.  I tried two varieties, banana and peach.  The peach flavor sort of dissolved in the baking, so I think I would add probably an extra cup of peaches if I were to make them again.  I considered making pomegranate with the frozen jewels (that's what they're called, right?) we have, and I'm sure any kind of fruit will do just fine in this kind of muffin.

The base recipe was essentially the banana bread muffin recipe I've posted before, only with alterations in the flour (I take it no one ever made those muffins when I posted it before because the flour is GREATLY under-measured.  Sorry about that.)  Also, sorry I don't have any pictures.  I never really had the time or thought to do it.  But please please please trust me they are really good.  Anyway, here we go:

Fruit Oat Muffins
based on Reyna's banana bread, altered to meet my needs
makes about 15-18 muffins


1/2 stick butter (notice this means 1/4 cup of butter)

1 1/3 c. sugar (I've been meaning to try it with less, perhaps 1 cup?)

2 eggs

1 1/4 tsp. vanilla

1+ cup of flour

1 tsp. baking powder

1 tsp. baking soda

3/4 c. sour cream

3 mashed ripe bananas or 2-3 cups diced peaches, or any amount of any fruit you want to try

cinnamon and nutmeg to taste (I use a LOT, like maybe 2 T?)

1+ cup oats

1. Preheat oven to 350 and prepare muffin pans.

2. Then, beat butter until fluffy.  Gradually add sugar. Continue beating until light and fluffy.

3. Beat in eggs one at a time. Add vanilla.

4. Add sour cream to the sugar mixture.

5. Add bananas or whatever fruit you're using.

6. Sift flour, baking powder, soda, and salt together.  Add to mix until just blended.  Add cinnamon, nutmeg, and oats.  If the batter is not the right thickness, add a little more flour until it is (I don't know how to describe it...not very runny, sort of chunky?).

7. Turn into prepared pan. Bake at 350 degrees for about 30-35 minutes (depending on your oven) or until pick inserted into center of muffins comes out clean and they look and smell delicious.

Home-made Macaroni and Cheese

I like macaroni and cheese.  I used to have it maybe every couple of days before I got married (the alternate days were nearly always pizza...what was wrong with me).  I hardly ever eat it now, so we don't really buy it.  When I'm craving it, I am sad.  Until I finally sat down and did a little research on how to make it on my own!

When most people hear "home-made macaroni and cheese" they think of a breaded casserole that you eat with ketchup or something.  This is like legit macaroni and cheese in a pot like you'd get in a box.  Only better because it isn't made with powdered cheese curds or whatever, and you can make it from what you have on hand.

It took me a couple of tries to get this recipe to be really good.  The first time it was incredibly bitter and not very creamy.  Also, when I did this, I wasn't really measuring, I was just going by proportions, so hopefully you will still be able to follow.

In my research (during which I became quite familiarly acquainted with Paula Dean's personality during a side track) I learned that you must have an appropriate amount of cream in order for the cheese to bond and not clump.  Or somesuch.  That is why most mac and cheese recipes require cream.  However!  I don't keep cream on hand.  It also supposedly turns out better if you use two to four different types of cheeses.  But all we have is medium cheddar.  So there are a lot of other options for making this kind of macaroni and cheese if you go buy different ingredients (or maybe you regularly stock your fridge with cream and three types of cheese), but this recipe is mostly to make it with what you have on hand and make it taste delicious!  Now, read on, MacDuff!
Creamy deliciousness.
Home-made Macaroni and Cheese
from THE MIND OF ME
serves about 1-2 people

1 cup or however much pasta you are making (I like elbows chiffere, the ridges catch more sauce)

1/4-1/2 cup stick butter or margarine (depending on how buttery you want it...I like it buttery)

1/2 cup milk (keep more on hand in case you need it later)

1/2-1 cup cheese of choice (if you use a milder or white cheese, you might want to supplement with a little of something sharper)

fresh ground black pepper

sweet basil (dried/flaked/whatever...in your spice cupboard)

1. Boil and drain the pasta and return it to the pot on low-medium heat.

2. Add the butter and stir around until pasta is coated.

3. Add the milk.

4. Add the cheese.  Make sure the heat is up enough to melt the cheese relatively quickly (turn it up if you have to, I don't remember how hot I had it in the end).  Stir the cheese into pasta slowly, making sure it melts and doesn't clump.  If you need to, add a little more milk, or if you want, more cheese.

5. Grind in a bit of pepper.  Don't add too much!  The cheese will already be a little bitter and you don't want to overdo it.  Stir again, keeping an eye on the cheese and making sure it has melted properly.

6. Add a little basil, to taste.  The mildly sweet herb will help to offset a bit of the bitterness.

7. Taste test!  Add more of whatever you think it needs, or just eat it!  Say yum.

Tuesday, October 2, 2012

Nutella Cupcakes

I really love cupcakes.  Mucho.  And while the regular flavor kind with regular flavor frosting is my favorite, I love experimenting with different kinds, especially when it means I don't have to frost 3 dozen tiny cakes.  Which I've done.  And I wanted to shoot Betty Crocker.

And so, when I saw this recipe for "self-frosting" nutella cupcakes on Pinterest (it doesn't always have practical application, but this was one of those times when I trusted it), I decided to try them as a nice treat, because I think it's been like two weeks since I've made dessert, and that's a grave oversight.
NUTELLA.  It rules the universe in some places.
The only problem I had with these was that it was nearly IMPOSSIBLE to "swirl" the batter to make it look even remotely nice.  I tried using a chopstick first and when that was impossible, I quit and switched to a butter knife, which was even more difficult.  I don't think skipping the muffin papers would help either, because the dough would probably stick to the pan, even if it was sprayed.  So just be patient as you are swirling in the nutella and keep chanting to yourself "nutella, nutella, nutella..." or whatever it takes to keep the end goal in mind.  Because they are really delicious.

The only other thing is that the cupcakes get firm around the edges really fast, so you're probably going to have to eat them really quickly.  OH WELL.
Swirly twirly -ish

Nutella Cupcakes
by Babble.com at Shine via One Ordinary Day

1/4 cup butter, at room temperature
1/4 cup canola or mild vegetable oil
3/4 cup sugar
3 large eggs
1 tsp. vanilla
1 3/4 cup all purpose flour
2 tsp. baking powder
1/4 tsp. salt
1/4-1/2 cup Nutella, at room temperature

Preheat the oven to 325F.  In a medium bowl, beat the butter, oil and sugar with an electric mixer until light and fluffy.  Add the eggs and vanilla and beat until smooth.

In a small bowl, stir together the flour, baking powder and salt; add to the butter mixture and beat on low speed just until combined.  Divide the batter between 12 paper-lined muffin cups.  Drop a spoonful of Nutella on top of each, and swirl through the batter with the tip of a bamboo skewer or knife (or chopstick.  Or claws of death-- patience, young padawan!).
Swirl away, my son
Bake for 25-30 minutes, or until springy to the touch.  Cool on a wire rack.

Makes 12 cupcakes.

Wednesday, September 19, 2012

Lemon Vinaigrette Dressing

Yesterday evening Sam and I went over to have dinner with our good friends Mel and Eric.  Mel made some delicious baked macaroni and cheese and provided bread and drinks, while I brought the ice cream and a salad.  Well, we brought them, but I made them.  So there.

Anyway, I didn't want to bring a boring salad, so I decided to try making an interesting dressing.  After some cud-chewing (with myself) I decided on a lemon vinaigrette.  All of the recipes I found included ingredients I didn't have, so I winged it (wung it? who knows).  And the dressing was actually really good.  Here it be:

Lemon Vinaigrette Salad Dressing

1/3 c olive oil

ALL the juice in one lemon

a few grinds or shakes of pepper

same of salt

1/3-1/2 purple onion, diced small

1/2 t dry thyme or one sprig fresh, leaves broken up to release flavor

1 tsp honey

1. Chop the onion.  Combine all the stuff.  Stir it up.

2. Refrigerate for 1-2 hours so the flavors will leach into each other.

3. Pour onto/toss into salad.

Cronshe me.
 A note on the salad: I bought a spinach/romaine/spring greens mix bag because it had all I wanted with no excess.  Then I chopped up a fresh tomato from Sam's grandparents' garden and tossed that in, along with a bit of crumbled feta cheese.  Then the dressing went on.  Oh, and the onion was also fresh from the garden.  I sure do love fresh produce!
Look at the ripeness and red juiciness!  Also, that's my favorite knife.  It's like a mini-santoku. 

Tuesday, September 18, 2012

Peach Ice Cream

So what do you do with a zillion fresh peaches sitting in your freezer?  Why, you break in your ice cream maker with fresh peach ice cream!

The recipe is simple.  It's adapted from one I found in the booklet that came with our ice cream maker (we have this model).  It makes about 1.5 quarts.  And it is so very delicious!  
Peach bits and vanilla...yum!
Fresh Peach Ice Cream
Adapted from "Cuisinart Recipe Booklet"

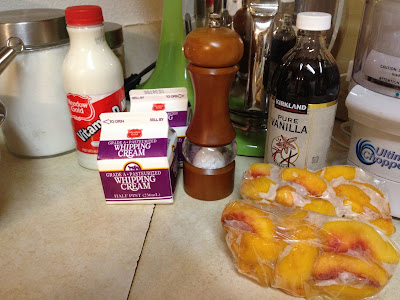
All you need


1 1/2 - 2 c fresh peaches

3/4 c whole milk

2/3 c granulated sugar

pinch salt

1 1/2 c heavy cream

1 1/2 tsp vanilla (I think I may actually have put in 2 or even 2 1/2)
1. Put peaches into food processor and chop, mostly thin and small, but with some bigger chunks.  This works a lot better when the peaches are frozen.  Otherwise they kind of just turn into a mush.

2. Combine milk, sugar, and salt in bowl.  Whisk until sugar dissolves.  Stir in cream and vanilla.  Stir in peaches, juice and all.  Cover and refrigerate 1-2 hours.

3. Freeze according to your mixer.  With ours, all you do is pour it in and turn it on for 15-20 minutes (although it was done in 12).

Mixing mixing mixing...
4. It will be soft.  Serve immediately or put in airtight container and put in freezer for 2+ hours (or overnight and all day).  It will be rock hard, so pull it out a few minutes before you want to eat it.

Ready for freezing

Sunday, September 16, 2012

Red Beans and Rice

Here's a fun fact: It's possible to learn new things about people you know really well, even after you've known them a while.  I recently found out that Sam has Cajun blood in him (who knows what secrets I'll discover after 50 years of marriage).  The following information may be slightly wrong, and is based off of quick research based off of Sam's hazy memory of the subject.

So.  Sam's mom's dad lives in Louisiana.  His family has for a while.  When I asked why, I learned that Sam's German ancestors (there are a lot of those...on both sides) went to New Orleans and mixed with some French Cajun peeps.  La di da.  This is no doubt of great interest to you all.  What does it mean for you?  It means access to family recipes for Cajun food...
Tastiness in a bowl
Red Beans and Rice
Ye Olde Familie Recipe
[side note: the original recipe serves ~2 people.  We made 4x that for some reason, but it's delicious so I don't mind the leftovers]

1 lb dried red beans

1 stalk celery (we didn't want to buy a whole huge bunch, so we got little celery snack packs, which, incidentally, were cheaper, and Sam had little packages of them for lunch)

3 bay leaves (~1 per cup of beans)

1-2 cloves garlic

1 medium onion, "naturally chopped"

12 oz Cured salt pork (this is the closest thing available around here to the pickled pork originally called for)

Rice (for serving over/with...Sam added a little Zataran's blackened seasoning while steaming for kick but it was very subtle)

1. Prep and soak the beans over night.  Rinse and cull again.

2. Set beans to boil in just enough water to cover them.

3. After about an hour, sautee celery, pork, onion, and garlic.  Dump entire frying pan into pot, juices and all.

4. Let it all boil for another hour and a half.  Stir often to keep beans from sticking to bottom and sides.  As water level gets low, add more periodically (just enough to keep them covered).  Add some salt and pepper if you like that (if you prefer it sweeter, instead of salt, and 2T sugar as it says in the recipe below).

5. About 30 mins before the boiling time ends, add a glob of butter.  Sam added a half a stick, but as his grandma says "You can nevah have too much buttah!"

6. Serve hot over prepared rice.  You're supposed to serve it also with a crusty french bread to soak up the juice, but they don't believe in good bread in Utah and I didn't have time to make any, so we just used what we had.

Other things: you can adjust the recipe for how much you're making, because obviously we did.  Also, Sam says don't ever cook it longer than 2 hours "unless you're making a really, really, really big batch."
Another thing, don't cut off any gristle or fat before you cook it because it adds to the flavor.  But you can cut it off and boil it in, picking it out later.  You're going to pick it off at some point anyway, unless you like eating fat.

And, just for funsies, the original family recipe (complete with awesome southern talk and random tidbits):
"The smell will start to make you hungry, so have a glass of white wine along about now." 

Saturday, September 15, 2012

How to Dry Fresh Herbs

Yesterday Sam and I went to pick up a piece of mail from his grandparents' house.  They have a garden.  It's near the end of the season.  They were going out of town.  We got full and complete access to their produce!  YES!

Good thing, too, because Sam completely forgot to hit "okay" when purchasing our Bountiful Basket earlier this week, and we missed the deadline.

So what did we get?  We got a huge box of peaches (which were nearly all ripe, overripe, bruised, etc, and so got cut up and put into portions in the freezer for smoothies and maybe fresh peach ice cream), we are "the proud owners of three great purple onions," we got a few zucchinis at various stages of nibbling and growth, a few little green bell peppers, a few enormous beefsteak tomatoes, and a couple of Anaheim chilis.  Oh, and a bunch of fresh herbs!

I believe we acquired: basil, rosemary (used here), thyme, oregano, sage, savory, marjoram, and a couple of stray chives.  Like I said, we used a bit of the rosemary last night, and this morning I took it upon myself to attempt herb-drying.

There are a few different methods, especially depending on the herb.  Knowing my luck, I'm not expecting all of these to turn out.  But in the meantime the kitchen smells amazing.

The only thing you really need to know is whether your herbs are low or high moisture content.  I think a good way to tell is: do they start to wilt when they have been picked for a few hours?  Basil I know is a high-moisture content herb.  Things like rosemary, savory, thyme, etc, are low-moisture content.  A simple google search will tell you whether you can air dry the herbs or you need to dehumidify them.

Simplified tips on how to dry your own herbs (cause I know you have lots of them):

Unwrapped and wrapped piles, plus scissors and string that we had on hand.

All herbs for air-drying (low-moisture content) have been tied at the stems with their few base leaves removed.  The base leaves will be mostly flavorless when they are dry because they are oldest.

In the mean time, the basil, which must be dehydrated or it will get moldy (it has a high moisture content like mint and some other herbs), sits in the oven on the lowest heat setting for 20 mins.  It will sit in their for 1-2 days, and once or twice a day I will turn on the low heat again for 10-15 minutes. This is because I don't have a dehumidifier/dehydrater.  I'm sure it's easier with one of those.

The low-moisture-content herbs are hanging in a cool, dry place.  It was recommended that I put them in a slotted paper bag to keep dust and spiders off, but I didn't feel like it.  Plus we have no paper bags.  I feel like I live on a French farm or something awesome.  The huge bunch at the bottom left is Savory.  I've never used Savory before, but it smells delicious and soft.

Lemon Rosemary Pasta with Chicken

I could live solely off of pasta and bread, I think.  And for some reason it's been a little while since we've had good pasta.  And when you add lemon and rosemary (and chicken) to pasta... It's pretty dang good.
Flavorsssss Precious
This recipe is sort of based off of the lemon pasta from Smitten Kitchen that I made a couple of times (I didn't blog about it.  One of my five readers gave me the recipe, so it felt redundant).  Only the Smitten recipe Sam didn't like.  He thought it was way too lemony and I thought it was a little too complicated.

And so this idea was born.  And it's pretty simple.
Ta-da!
Lemon Rosemary Pasta
From My Brain 
-- serves 2 with a little leftover for lunch tomorrow

1 lemon, halved

1 good-sized sprig of fresh rosemary

~1/4 lb fresh grated parmesan cheese (it's not a lot)

1 handfull long pasta (spaghetti, linguine, etc)

1 or 2 chicken breasts

1) Put a dash of olive oil in a pan and bring the pan to medium heat.  Score your chicken breasts strip-size (but don't cut all the way through).  Put the breasts in the frying pan to brown and cook through.  Take one lemon half and squeeze contents over top and bottom, periodically over the time the chicken is cooking.  Pull some rosemary from the sprig and break leaves up, sprinkling over breasts (and in the serrations if you can).  Add a little fresh-ground salt if you want.  Continue to cook (on lower heat once browned so it doesn't burn) until chicken is cooked all the way through.

2) In the mean time, have a pot of water boiling.  Cook pasta according to package, adding a few drops of lemon juice to the water, if you want.  When al dente, drain.

3) Return pasta to pot.  Squeeze second half of lemon onto pasta.  Zest both rind halves well into the pasta.  Stir up.  Strip remaining leaves from rosemary sprig and break up into pot.  Congratulations, your hands now smell amazing.  Stir.  Toss in as much parmesan cheese as you want.  We used a little less than 1/4 lb fresh.

4. Cut chicken into strips.  Serve on top of or next to noodles.  I actually cut them into chunks and stirred them in, but I think I like it the other way better.  Anyway.

Bon Appetit!!!

Grumps don't get pasta for dinner.

Taco Soup

When I had my surgery back in January, my visiting teacher (who probably assumed my surgery was on a limb or something) brought this soup to Sam and I while I was recovering.  Fortunately she'd made it pretty mild, so I didn't have much trouble eating it.

Now that my digestive system is back in order, I can make this soup whenever I want (I got the recipe from her since I liked it so much).  Tra la la.

Anyway, you can make this as mild or spicy as you want, just adjust the seasoning.  Bonus!  It makes a lot, so you can freeze it!  I made the last batch in April, and we just finished it this week.  Times of yum.

Stir in some grated cheese and/or sour cream if you want, and eat with tortilla chips handy (I went to Cafe Rio with Adrien and got chips and we finished them up with dinner.  Sweet nectar of life.
So juicy SWEEEEET!

Taco Soup de Yum

1 lb hamburger, browned, sauteed with onions and celery if desired (I skip this because I don't like a lot of meat and the chili we use has meat already)

1 can corn (or about the same in frozen)

1 can black beans

1 can kidney beans (I think we omit this and don't replace it with more black...but maybe we do)

1 can chili (or chili beans)

1 can stewed tomatoes

1 8oz can tomato sauce

1 package taco seasoning

First, throw all the cans of everything into a pot and turn on heat to medium-high.  Add taco seasoning (to your taste...and I'm sure the soup might taste fine with it if you want to leave it out altogether), stir in, and heat through.

Done!

Thursday, September 6, 2012

Stuffed Bell Peppers

A few months ago, Adrien sent me a recipe for stuffed peppers that didn't look disgusting.  I made it.  It wasn't disgusting.  In fact, it was pretty good, considering I don't like that kind of thing!

Last night Sam asked me to make them again.  Actually it was a few days ago, and that's why I just happened to have two plump green bell peppers on hand.  But I could not find the recipe for the life of me!  So I made it up based on what I could recall and what I like.

This is incredibly easy (maybe 20 minutes from start to finish) and very filling and delicious.

What you need:
Things.
1 can chicken

1 can black beans

1-ish cup (or one can) frozen corn

1 T or so of onion flakes, reconstituted (because sometimes I am too lazy to cut an actual onion)

taco seasoning (or if you're like us and don't have any, this "Latin" meat rub)

cheese (this time we used cheddar, last time we used a cheddar/mozzarella blend)

2 plump bell peppers (not pictured, but you know what they look like)

How to proceed:

1. Set the oven to preheat to broil (or 350 if that takes too long).

2. Carefully cut out the top of the pepper/stem without taking too much (if any) of the flesh.  Then cut the peppers in half from top to bottom.  Cut out the seeds and ribs.  Line a small baking sheet or pan with tin foil.  Put the pepper halves on the foil OPEN SIDE DOWN.

3.  Put the corn (pre-steamed if it was frozen), beans, onion, and chicken in a pot or frying pan.  PUT THE PEPPERS IN THE OVEN.  Heat filling on medium-high for a bit.  Add taco seasoning to taste.  Add a little grated cheese if you want.

4.  Check your peppers after 2-3ish minutes.  The skin should just be starting to bubble and brown.  Take them out.

5. Flip over pepper halves when slightly cooler and fill with filling.  Top with enough cheese to make you happy.  Put back in oven until cheese is melted and barely starting to brown.

Done!  We topped the peppers with a couple drops of lime from the fresh limes we had on hand (Bountiful Baskets are fun!).  Use discretion though, too much lime and (as Sam said) it tastes like a British sailor.

We had a little extra filling that Sam took for his lunch today to mix with lettuce and possibly put in a tortilla.  I think it sounds good both ways.

Oh, and you can make these vegetarian by omitting the chicken.  Or meatier by using ground beef.

By the way, the frozen corn we have is parboiled fresh corn cut from the cob that we got in our basket back in January.  Delish.

Wednesday, August 8, 2012

Chelsea Market

In the heart of New York City (well, you know) is a fun place called the Chelsea Market.  It is advertised as a sort of "foodie's paradise," but I found that despite it's charm and delicious fare, it's become overly commercialized.  But I seriously still recommend it.

 We were boiling hot and starving, so the air-conditioned market place was a treat in itself.  We decided to lunch on caprese sandwiches.  They looked better than they tasted, unfortunately.

 One of my favorite places was the Ronnybrook Farm Milk Bar.  It was like an ice cream parlor, but they had milkshakes, milk, ice cream, chocolate milk, etc.  It was so nice after walking in the hot city summer to sit down and have a chocolate milkshake.  We asked the barkeep for the chocolatiest milkshake he could make, so he gave us chocolate ice cream blended with chocolate milk.  It was so creamy and yummy and I loved every drop.
Perfect on a hot day
Milk crate wall
After eating, we walked around and perused the other shops.  There was a butcher, a seafood place, a few bakeries, a couple of cooking specialty/supply stores, and a handful of other places.  I wish that I'd been able to find a good flavored crusty bread, but the bakeries only had regular breads, sadly.  I also wish that there'd been more selection.  The actual Chelsea Market is kind of a small area from one end to the other.  Like I said, it's been pretty commercialized.  Every place is an actual store, and I wish there had been more "markety" stands, but overall, the Chelsea Market is a pretty fun place to go, and if you're willing to spend the money, you can get some pretty tasty food.