Tuesday, March 29, 2011

A Tale of Two (Kinds of) Muffins

I've recently learned to love banana bread (as long as there are no nuts). I bought bananas about a month ago and they finally were brown enough to use. The day actually coincided with the day I tried the store brand of apple sauce I'd bought in attempt to save money (note to self: there's usually a reason the store brand is not the leading brand). It turned out to be too gross to eat, but I'm on a strict no-wasting policy now (I've always been bad at this, I'm turning over a new leaf), so I reached back into the files of my memory and recalled a time when I made applesauce muffins with my mom. I think I might've been about four years old. I have no idea. Maybe I wasn't. In any case, I don't remember anything else about them except that I had fun making them, and that they were good.

I googled an applesauce muffin recipe, pulled up a banana bread muffin recipe my friend had given me, and thus began the great muffin project!

It went along pretty much without a hitch (aside from a quick trip to the store mid-mix to get more brown sugar and butter), and I was able to successfully create 36 muffins from scratch in a one-hour window (curse starting late due to distractions and needing to finish on time so you can attend the soccer game of certain amazing boys and girls).
An army of muffins!

All in all, I was really impressed with the taste. We ended up giving 4 to one of the aforementioned soccer-playing girls, 6 to a group of those soccer-playing boys, and 8 to one other soccer-playing boy who really needed them (though I'm certain his roommates ended up eating them too). That left 18 to be consumed by my roommate and I, and boy was it worth every bite (no, we did not eat them all at once. I would have, but that would've been gross). And now, the recipes.

Applesauce Spice Muffins
adapted from Epicurious.com (mine has more spice)
For muffins:
1 1/2 cups all-purpose flour
1 1/2 teaspoons baking powder
1/2 teaspoon baking soda
~2 1/2 teaspoon cinnamon
~1/2 teaspoon ground allspice (didn't use, which is why there's so much more cinnamon)
~3/4 teaspoon nutmeg
1/4 teaspoon salt
2 large eggs
3/4 cup packed light brown sugar
6T butter
1 1/3 cup applesauce
1 cup pecans or walnuts (3 1/2 ounces), coarsely chopped (I omitted. Yuck, nuts!)

For topping:
2 tablespoons granulated sugar
~1 teaspoon cinnamon
~1/4 teaspoon ground allspice (again, didn't use)
~3/4 teaspoon freshly grated nutmeg
Prepare muffins:
Put oven rack in middle position and preheat oven to 375°F. Grease muffin pan or line with muffin papers. (The batter makes about 16 muffins)
Stir together flour, baking powder, baking soda, spices, and salt in a bowl. Whisk together eggs and brown sugar in a large bowl until combined well, then add butter, a little at a time, whisking until mixture is creamy. Stir in applesauce, then fold in flour mixture until flour is just moistened. Stir in nuts (if using) and divide batter among muffin cups.

Make topping and bake:
Stir together all topping ingredients and sprinkle on top of muffins. Bake until muffins are puffed and golden, about 18-20 minutes (depending on your oven-- keep an eye on them, you do NOT want these gems to burn).

Banana Muffins
adapted from Cooks.com with tips from my friend Reyna and my own adjustments
1/2 stick butter
1 1/3 c. sugar
2 eggs
1 1/4 tsp. vanilla
2 large heaping spoonfuls flour
1 tsp. baking powder
1 tsp. baking soda
3/4 c. sour cream
3 mashed ripe bananas
cinnamon and nutmeg to taste
1/2 c. chopped pecans (I omitted, again nuts=gross)

Grease or line muffin pan (again makes about 16 muffins). Beat butter until fluffy. Gradually add sugar. Continue beating until light and fluffy. Beat in eggs one at a time. Add vanilla. Add to sour cream to the sugar mixture. Add bananas and pecans (if using). Sift flour, baking powder, soda, and salt together; mix just until well blended. Turn into prepared pan. Bake at 350 degrees for about 30-35 minutes (depending on your oven) or until pick inserted into center of muffins comes out clean and they look and smell delicious.

P.S. Forgive my blurry and unprofessional photos. I live in a basement and took them at night.

Friday, March 4, 2011

Long Time, No Eat

No excuses from me. I'm sorry for the absence.
I actually made this back in January (eek!), possibly even before the soup post, I'm not sure. In any case, I wanted to show y'all that I don't always make desserts, and that I am also capable of making things that don't require several ingredients.
Thus, I give you...
A PLAIN OLD DINNER!!!
Bloo-ree
...And yet, so delicious! I started with frozen chicken tenderloins (cheaper than breast, but I'm definitely paying the extra next time, to avoid tendoniness) and marinated them in Worcestershire sauce/Mesquite spice/thyme/who knows what. I then proceeded to fry them up in olive oil, then steamed some peas in butter, and through some frozen sweet potato fries in the oven until they were (mostly) crispy. Add a side of ranch dressing, and WABAM, dinner!

I was very pleased with myself A) for having something other than macaroni and cheese for dinner, B) for remembering to take a picture of it for posterity, C) for using frozen food successfully, and D) for the marinade actually tasting good, even though I was pretty sure it wouldn't.

I took issue with the stringiness of parts of the meat (again, next time I'll splurge on breast). I was also kind of irritated that the fries were still a little mushy, even after cooking them longer than was required. Maybe that is just the way of sweet potato fries, but I wish it wasn't so.

Okay, I know this was a lame post, but I need to get back into the groove of blogging. It's been far too long.

Wednesday, January 19, 2011

Cold and Hot

I woke up this morning feeling pretty sick with the beginnings of a cold. I got through about three hours of school before downing a bunch of Ibuprofin, which got me through the next three hours, and as soon as got home I decided I needed to nip this cold in the bud.

The people in my neighborhood swear by green onions as a cold cure, so I decided to try it. Their philosophy is to eat the entire onion raw, and do it again to a few other onions. However, when my roommate tried it out a few months ago, she said she made a soup and just ate them that way. I decided that sounded a lot more appetizing, so I went and bought some green onions and chicken bouillion, and made a lovely soup!
Basically I boiled a little water in a pot, put in about five finely sliced green onions (cut down to about an inch or so above the root), then added two buillion (chicken flavored) cubes into the pot and stirred until the cubes were dissolved. I made sure to inhale the steam of the soup as it cooked, since that's part of the cure apparently.
I was afraid it would taste nasty, or not be salty enough, or some other thing, but it was actually fine just as it was, which was very surprising to me, because I don't like onions hardly at all. I didn't even need to add any salt! I just sipped the hot, hot soup and munched on the onions. Of course, a few saltine crackers didn't hurt.

After eating it all, I feel loads better (although I've downed so much of it I feel like popping), and I think it may have done the trick. So if you're feeling sick, try this out, and let me know if it works for you.

Note: I think there are a number of colloquial grammar mistakes in this post, but I'm chalking it up to being sick :)

Friday, November 26, 2010

Apple Pie

When I made my first apple pie, I used basically this recipe for the filling, and everything turned out perfectly. That was five or six years ago. I made a few more apple pies since then, but they all turned out pretty gross, to the point where no one wanted to eat them. Mostly it was a problem with the crust, and undoubtedly my focus on that part of the pie made me neglect the filling. In any case, it's been ages since I've tried to make a good pie, but when a pie-making contest was announced for my ward this past Monday, I was motivated to try again (and if it turned out well, I could contribute to Thanksgiving at my sister's).

I mulled it over, and decided that to try to fix the crust would be the best approach. I thought of all the reasons I didn't like pie crust, and determined that (aside from the time I attempted to create a whole-wheat crust-- which you should probably never do) the problem was always that it tasted dry and flavorless. I thought of the crusts I've made for quiche, and how they are flaky and buttery and wonderful. And then I realized butter might just do the trick! Up until that point I'd been using Crisco (and off-brand Crisco at that), so I decided to opt this time for the more flavorful and much-easier-to-work-with option.

Another thing that helped was that I let myself relax. If the pie didn't turn out, that was fine. If it didn't win, that was fine. Don't follow a recipe, just go with your instinct. Luckily I had that background of attempts to build on. In any case, it turned out perfectly. It didn't win, because the winner's crust was crumbly and interesting and amazing, but I heard I had the best filling. And it was the best (read: only) apple pie at Thanksgiving when I made it again yesterday. So I'll keep trying with the crust, and then the pie really will be perfect someday! Hey, I can dream.

Too late for Thanksgiving, but this will work well for Christmas, or for any day of the year, really.

Apple Pie
filling modified from some clipped-out recipe I found when I was fifteen; crust modified from Good Housekeeping

Crust
2 cups all-purpose unbleached flour
a couple of pinches of salt
3/4 (one and a half sticks) of butter/ vegetable equivelant (or shortening, if you want to go the traditional route)
water

1. Mix flour and salt.
2. Get your butter out an hour or two beforehand to make sure its soft, or leave it on top of the oven while its preheating (but not for too long, or it will melt). Do not microwave the butter!! Not only does it make it too liquidy, but it separates the parts. Just make sure your butter is soft, because if it's too hard, it will be difficult to work with.
3. Cut the butter into little chunks (about 1T each) and plop into the flour mixture. Work in with a fork or pastry cutter until the chunks are considerably smaller, then work in with your hands. This will guarantee the butter is worked in properly.
4. Add water, a tablespoon or two at a time, and work it in. Use your hands to tell when it's ready. The dough should be a little past the point where it's just coming together. Work into a ball.
5. Separate the ball into two parts, one ever so slightly larger than the other. The larger ball will be your bottom crust. Pound and roll out the larger ball into a circle and drape over a 9-inch pie or cake pan lightly dusted with flour on the bottom. Pour in filling.
6. Repeat process with smaller ball. Drape over top of pie, pinching sides together, making the edges look fluted if you so desire. Cut a few slits in the center of the top crust so the filling can breathe and seep as it cooks. Sprinkle with a bit of cinnamon-sugar if you like.
7. Place a cookie sheet under the pie to catch any drippings. Put in oven pre-heated to 425 degrees. Cook for about 40-45 minutes (this will depend on your oven, of course). Pie will be done when the crust is golden brown and apples are tender.

Filling
6 medium red delicious apples (not too tart, not too sweet)
lemon juice (it's better if you use the bottled kind in this case, that way you're not limited to what a lemon will give you)
2 T flour
3/4 c white granulated sugar
pinch or two of salt
2 T cinnamon
1/2 T nutmeg

1. Peel the apples (I found that using a peeler, and not a knife, makes this part far less tedious), cut out the core (make sure you get off all the hard parts of the seed center), and cut into little chunks about the size of a section of your finger (you know...where the joints separate...nevermind). Do it one apple at a time, and sprinkle with lemon juice after each to prevent browning of the apple pieces.
2. Mix the flour, sugar, salt, cinnamon, and nutmeg. The original recipe called for far less cinnamon and nutmeg, so if you don't like flavor, reduce it all you like. Actually, the measurements I gave you for those two ingredients are more of my estimate. You should go more by what you think smells and looks like enough.
3. Pour the "spice mix" into the apple chunks, and mix up with your hands (or a wooden spoon or rubber spatula. Don't bruise the apples.). Pour the mix into the pie crust, and don't forget the leftover goop at the bottom of the bowl!

Monday, November 15, 2010

Gluten Free Thanksgiving

Every since I did my challenge last year, I've tried to be conscious of that (rather large) group of people out there who love to eat, but are limited by food allergies of various sorts. Anyway, so since Thanksgiving is coming up (and even though I don't know if there's anyone that reads my blog that has needs like this), and everyone has something to be grateful for (like regular foods that don't set off your allergies), I thought I'd direct you towards a couple of blogs that have highlighted gluten-free Thanksgiving foods. Enjoy!


Both those bloggers live gluten-free lives, so all (or nearly all) their stuff fits that profile, so you can be safe just searching their blogs for a particular food.

Happy Thanksgiving everyone! I'm glad this blog has been going for over a year now :)

Wednesday, October 20, 2010

Black Bean and Pumpkin Chili

Last night I had some of the best homemade soup I've ever tasted. What surprised me was that it had so many things I usually hate in food (ironically, I'm one of the pickiest eaters you'll ever meet): chili powder, tomatoes, onions, and pumpkin. Don't get me wrong, all those ingredients are perfectly fine for adding flavor or visual excitement, I just don't like to eat them. Anyway, all of my preconceived notions flew immediately out the window when I tried this soup my friend (not sister) Megan made. It was delicious! I even went back for seconds (and wouldn't have been opposed to thirds...).

I asked Megan to send me the recipe (sorry, no pictures), as well as the changes she made, so here it is for your enjoyment. This is a perfect fall soup/chili, so get on it!

Megan says: "So I actually used a green pepper because the yellow peppers at the store were gross. Also I only used a small can of chicken broth (cause that's all I had) and then added about a half a can of water. I also added more salt at the very end to add more flavor."

Black Bean & Pumpkin Chili
From Taste of Home
Serves: 10 (yields about 2.5 quarts)

1 medium onion, minced
1 medium sweet yellow pepper, chopped
3 garlic cloves, minced
2 tablespoons olive oil
3 cups chicken or vegetable broth
2 cans (15 oz each) black beans, rinsed & drained
1 can (15 oz) solid pack pumpkin (make sure it's not the pumpkin pie kind, just the pumpkin puree) Megan also says she isn't sure that hers wasn't pie filling, but at least it wasn't spiced.
1 can (14.5 oz) diced tomatoes, undrained
2 teaspoons dried parsley flakes
2 teaspoons chili powder
1 1/2 teaspoons dried oregano
1/2 teaspoon salt

In a large skillet, saute the onion, yellow pepper & garlic in olive oil for about 2 mins. Add the ground turkey and cook until brown. Transfer to a 5qt slow cooker/crock pot; stir in the remaining ingredients. Cover and cook on low for 4-5 hours or until heated through.

Sunday, October 10, 2010

Madeleines

A couple of months ago I found a madeleine pan at DI (huge thrift store) for $2. Ever since then, I've been wanting to make the yummy-looking scalloped French cakes. Are they cakes? I think they are.
Madeleines
Anyway, this morning I finally got around to it. I gave them to a friend of mine who needed them, but not before my roommate and I tried one (that's the good thing about making not cakes for people-- you can have some and they will never know). They were very lemony, soft, airy, moist, and otherwise delicious. There are a couple of kinds of food I usually have trouble with, and one of them is French pastry. So if this counts as pastry...I'm finally getting the hang of it!

The key flavors in madeleines are butter and lemon, but the key ingredient is egg. The eggs have to be whipped into lighter-than-air goop, otherwise you won't get the airiness. The recipe calls for 4 minutes of high-powered whisking, but since I'm still using my muscles to mix things, it was a little harder to do, and I was worried that they wouldn't be fluffy enough. But I think all this manual labor is paying off, because I got the egg pretty frothy (and my upper arms have been a little sore lately from it all...yay?).
Adding butter to the froth
As for the butter, I'd completely forgotten to restock when I was last at the store, so I used tub butter (or margarine, whatever), and microwaved it (there's a recommended process for the butter in this recipe to melt it on the stove for a while, allowing it to become golden and "nutty," then straining it) and it still turned out okay! I also didn't think there was enough lemon in the zest, so I also squeezed in a bit of the juice (plus I'm focusing on not wasting, so win/win) into the batter, which made it better. Yep.
Zested lemon
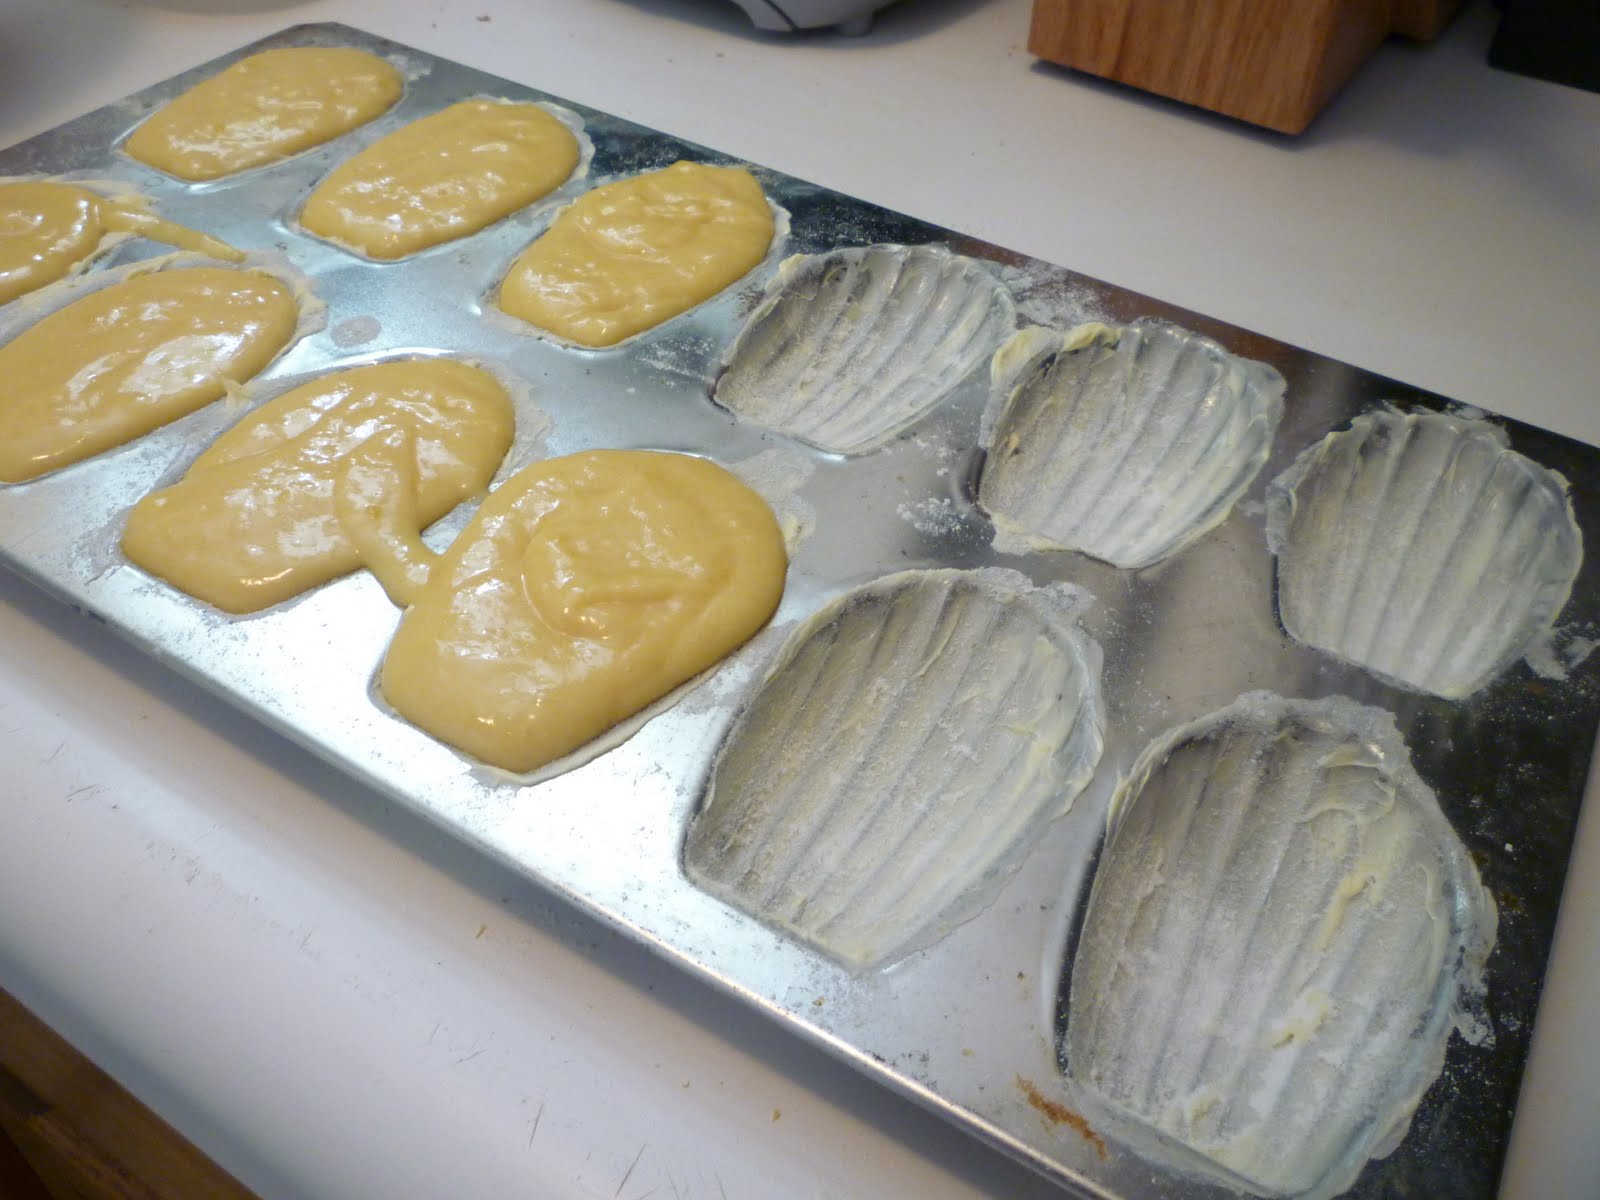
Also, the batter only made enough for barely 11 madeleines instead of 12, but I found out after they cooked that it's because I probably put way too much in each form/mold/whatever.
Filling the pan molds
Anyway, now for the recipe. I don't remember where I got it, and usually I'm really good about writing it down, but a good guess would be Smitten Kitchen, or maybe Tartelette. Check 'em both out.

Classic Madeleines [Madeleines Classiques]
adapted from Patisserie Lerch, via Paris Sweets

3/4 cup (105 grams) all-purpose flour
1/2 teaspoon double-acting baking soda
2 large eggs, at room temperature
1/2 cup (100 grams) sugar
Grated zest of 1 lemon to zest a lemon, you basically use the skinny bumpy part of your cheese grater to scrape off the rind. The grated rind is the part you use. Check out the picture if you don't know what I'm talking about.
2 teaspoons pure vanilla extract
5 tablespoons (2 1/2 ounces; 70 grams) unsalted butter, melted and cooled

1. Sift together the flour and baking powder and keep close at hand. Working in a mixer fit with the whisk attachment, beat the eggs and sugar together on medium-high speed until they thicken and lighten in color, 2 to 4 minutes. Beat in the lemon zest and vanilla. Switch to a large rubber spatula and gently fold in the dry ingredients, followed by the melted butter. Cover the batter with plastic wrap, pressing the wrap against the surface to create an airtight seal, and chill for at least 3 hours, perhaps longer–chilling helps the batter develop its characteristic crown, known as the hump or the bump. (The batter can be kept tightly covered in the refrigerator for up to 2 days.)

2. Center a rack in the oven and preheat the oven to 400 degrees F (200 degrees C). If your Madeleine pan is not nonstick, generously butter it, dust the insides with flour and tap out the excess. If the pan is nonstick, you still might want to give it an insurance coating of butter and flour. If it is silicone, do nothing. No matter what kind of pan you have, place it on a baking sheet for easy transportability.

3. Divide the batter among the molds, filling them almost to the top. Don’t worry about smoothing the batter, it will even out as it bakes.

4. Bake large madeleines for 11 to 13 minutes, small ones for 8 to 10 minutes, or until the cookies are puffed and golden and spring back when touched. Pull the pan from the oven and remove the cookies by either rapping the pan against the counter (the madeleines should drop out) or gently running a butte knife around the edges of the cookies. Allow the madeleines to cool on a cooling rack. They can be served ever so slightly warm or at room temperature.